Tuesday, January 31, 2012

Gmail and Contacts get better with Google+

We want to bring you a great experience across all Google products which, for Gmail and Contacts, means understanding what you care about and delivering it instantly. With that in mind, we’re introducing some new integrations with Google+ that we think will make Gmail and Contacts even better. If you use Google+, you can now grow your circles, filter emails and contacts by circles, keep all your contact information up-to-date automatically and share photos to Google+, all right from Gmail and Contacts. Grow your circles from your email Now when you open an email from someone on Google+, you can see the most recent post they’ve shared with you on the right-hand side of the conversation. If they’re not in your circles yet, it’s easy to add them straight from Gmail. 
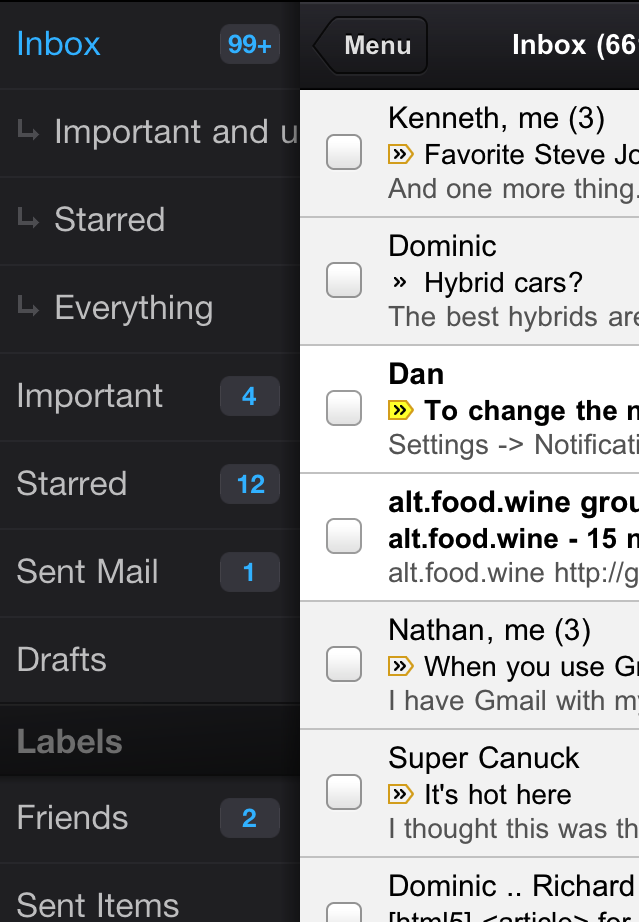
Find information from the people you care about most Looking for the info on an upcoming family holiday gathering but can't remember who sent it? If you've spent time building your Google+ circles, you can now quickly use them to filter your mail, saving yourself from having to sift through that pile of daily deal emails and newsletters. You can see messages from all of your circles at once or from each individual circle. And if you want, you can show circle names on emails in your inbox. Contacts can also be filtered by circles, making it easier to view your social connections. Keep your contact information up-to-date automatically Manually entering contact information can be a huge time drain—so let your circles do it for you. If your contacts have a Google profile, their contact entry in Gmail will be updated with the profile information they’ve shared with you, including phone numbers, email addresses and more. If they change it in the future, you’ll get those updates automatically. You can also make sure the people you care about have your most up-to-date contact information by updating your own Google profile and sharing it. 
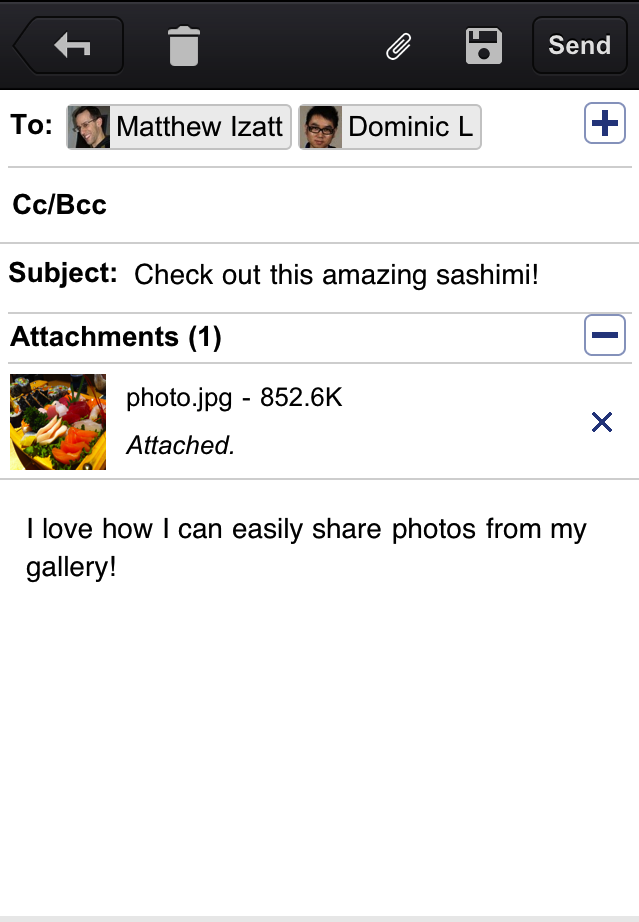
Share effortlessly without leaving your inbox Lots of great images are sent through email, but sharing those photos with friends on Google+ used to require downloading the image from Gmail and re-uploading to your profile. Not anymore: Now you can share photo attachments with one quick click. The image(s) will be uploaded to your Google+ photos and be viewable only to the circles that you choose to share with. We’ll be rolling out all of these changes out over the next few days to Gmail, Gmail Contacts and the “standalone” version of Google Contacts at contacts.google.com. Please note that Google Apps users won’t see the Contacts updates quite yet, but we’re actively working to make them available.   All of these features (and the more to come) are the result of the great discussion that we had on Google+ with users in July. If you want to join in discussions like these, add the Gmail Google+ page to your circles. And if you haven't signed up for Google+ and would like to try these new features, visit this page to get started.

Image Results for Custom Search Engine

Since the launch of Custom Search in 2006, CSE has powered searches on a broad range of sites on the web. Until now, those CSEs have only returned text-based results, but in some cases images can be a much faster, easier and more visually appealing way to search. For photos-focused sites, image results are a great way to showcase your beautiful photos and help visitors to your site quickly and easily find the photos they want. We also think sites focused on news, celebrities, art and digital production assets will similarly benefit. Now you can add an image results tab to your CSE to offer your visitors image-only results in a variety of image-optimized presentation formats. Once you enable this feature, your CSE will have two tabs. The first has your current web search results and the second, Image tab, contains the image search results. Here’s an example from India-Forums.com:
Enabling image results is easy! Just visit the Basics page of your CSE’s Control Panel and check the Enable image search checkbox. You can change the layout of your image results on the Look and feel page.
Once enabled, you’ll also be able to get separate image search reports from your CSE’s Statistics page. This new feature is available to all users of our Custom Search Element (you will need to Get Code and update your site). Since we are transitioning all iframe users to the Element, this should be most sites. Our Google Site Search users can also access Image Results via XML. To learn more about Image Search for Custom Search, please visit our help center. Let us know what you think in our discussion forum.

Friday, January 27, 2012

Google Earth 6 now required for Street View

When Google Earth 6.0 was released, it completely changed the way that Street View worked. However, Google kept the older layer active for previous versions of Google Earth so that those users could continue to use Street View. Not anymore. Sometime in the past few weeks, Google has turned off that old layer. If you're wanting to use Street View in Google Earth, you're now required to be using version 6.0 or higher. Here's a quick look at how to use Street View in Google Earth 6: In addition to that video, I've built a few other Google Earth tutorials to help explain some features, including how to use historical imagery, elevation profiles and a few more. Beyond that, Google has just released Street View imagery in South Korea, primarily in Seoul and Busan. As you can see from the screen shot below, the imagery in those is very sharp. seoul.jpg 
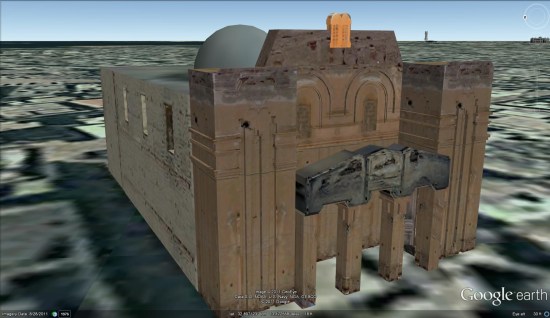
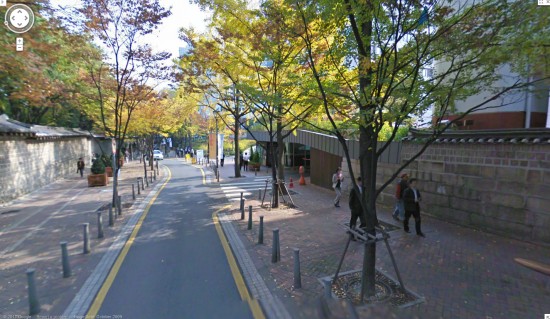
You can read more about the new South Korean Street View imagery on the Google Lat Long Blog. If you still need to upgrade to Google Earth 6 to get the new Street View features, you can always download it (for free!) from earth.google.com.

Wednesday, January 25, 2012

SketchUp: Make Ideas Real

Reviewing the hundreds of designs that SketchUp users have submitted to the Make Ideas Real project, we’ve noticed that a large number of submissions could be described as “useful.” (Shocker right? People design things for a reason!) For some folks, “useful” means a project they’ve designed and built for their personal use. For instance, these two submissions are great examples of (small and big) personal projects modeled on SketchUp:  
  Bird's Eye Maple Side Table by Chris Donaghue   
  Tool Shed by Gary Watson  “Useful” also means creating something of value for other people, and then actually selling it! Consider the Kapsule Lightstand, a lighting accessory for the Amazon Kindle, designed by Jonathan Hirschman of the NYC SketchUp User Group. (PS You can actually help fund this project through Kickstarter!).  
 
  Kapsule Lightstand by Jonathan Hirschman  We were also impressed by this Apple cord holder from Dean Heckler of Heckler Design: another Kickstart project with great design, and also a great design story:       Whether you design projects for yourself or for the rest of the world, we want to see what you’ve created. If you have a SketchUp model that has become reality, add it to our Make Ideas Real collection!

Google Body becomes Zygote Body

Google Body was built by Google engineers in their “20% time” and was retired along with Google Labs last year. Today we’re pleased to announce that the software underlying Google Body is now open source. Zygote Media Group, which provided the imagery for Google Body, has used this open source code to build Zygote Body (zygotebody.com). Zygote Body offers the same navigation, layering, and instant search as Google Body. Like Google Body, Zygote Body can be used in browsers that support WebGL, like Chrome and Firefox, without needing to install additional software.
To support the release of Zygote Body, the Google Body team built a new open source 3D viewer, now available at open-3d-viewer.googlecode.com. This viewer provides a standard way to create and view 3D models in a Web browser, with multiple layers and instant search. A sample model (by 3D artist Leo White) is included; Google Body users may recognize it as the Google Cow, first seen on April Fool's Day 2011.
By Roni Zeiger, Google Body 20% team

The MLK National Memorial in 3D

Not long after recreating the Stone Mountain sculpture in 3D, Peter Olsen decided to tackle the brand new Martin Luther King National Memorial, located in the National Mall in Washington, D.C. As you can see below, his model is amazingly detailed. Not only is the figure of MLK curved and detailed, but the text on the side of the statue is very clear and readable. However, just like his Stone Mountain model, he found that it was difficult to piece together because some things simply weren't adding up. mlk.jpg In his words:
When you read the literature on the "creation" of the monument, the sculpture consists of a "mountain" (The Mountain of Despair) from which a "stone" (the Stone of Hope) has been pushed. (See the write-up on the official web site) There is also an animation somewhere that I came across that shows the stone centre being pushed out from the middle of the mountain. So based on that I built the central stone first, as per the above, and was then going to clone the central faces of the mountain from the sides of the stone. There is just one slight problem. Based on numerous photos if have studied, if you take the stone and push it back into the slot in the mountain it does not line up with the cutaway sides of the mountain.
The average person would never notice this anomaly. However, Peter takes great pride in building incredibly accurate models and little missteps like this can be frustrating. In any case, he did an amazing job with the models. As you can see, he built all three sections of the memorial -- the mountain, the model of MLK, and the memorial wall. mlk-wide.jpg 
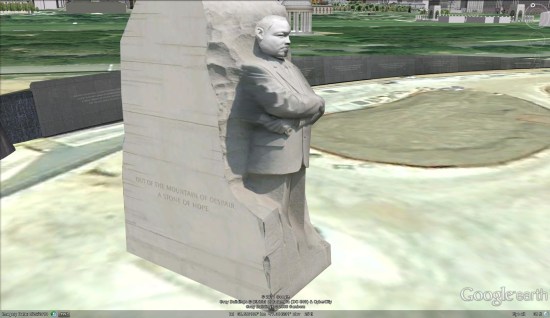
To see it for yourself in Google Earth, simply fly there using this KML file.

Beginner’s Guide to Building a Map Server

  There are a lot of great mapping applications out there that run on a server. They can be intimidating to install and configure so I thought I would document my steps so everything would be in one place. This a a guide for the absolute beginner so if you have some command-line experience, I promise I’m not being condescending. Future posts will cover how we’re actually using these tools to build our maps. This tutorial should take you from absolutely nothing to a fully-functional web server containing:
  • PostGIS: A PostgreSQL database optimize to store spatial information. It can easily import shapefiles and OSM data using command line tools as well as connect to mapping services like QGIS and Mapnik.
  • Mapnik: A very powerful tool for automatically generating maps from geographic data with lots of control over cartographic display and rendering.
  • TileStache: A simple way to efficiently serve geographic data to mapping applications. It can send tiled vector or raster data and will speed up any application that needs to load lots of data.

Basic Setup

I’m going to be using a Rackspace Cloud Server for this example. It’s a cheap way to get a server up and running and I’ve found them to be great with support. They automatically build your server and install the operating system. You just need to select 3 things:
  1. Operating System: Ubuntu 11.10 (Oneric Ocelot)
  2. Server Name: tiles
  3. Server Size: 1024 MB of RAM and 40GB of disk
The RAM and disk space are the bare minimum requirements. Fortunately, Rackspace let’s you upgrade your server at any time so it’s easy to configure it small as a sandbox and then beef it up if you decide to put it into production later on. Once you click “Create server” you’ll see your new root password. Copy it to the clipboard but don’t worry about keeping it super-safe. We’ll change it as soon as we log in for the first time (they also email it to you). Setup will take about 5 minutes to complete and they’ll email you when it’s finished.

Terminal and Remote Access

Since this server is in the cloud (ooooooh), the only way to access it is remotely through SSH. Open any SSH client you like (Terminal is already installed on OSX) and get comfortable. First thing we need to do is to log on to our remote server. Make sure you have that email with your root password and IP address and type into the terminal window:
ssh root@
(For future reference, don’t type any of the code sections in bold and italics surrounded by < >. Replace your stuff there.) That command tells the terminal to start an SSH session, logging in as root to the server at the specified IP address. The root username is the default admin of the server. We’ll do most of this setup as root since it has full control over the system. When it asks, just paste your root password from the email and you should be logged in and should see something like this:
root@tiles:~#
The # tells you the system is ready to receive commands. Let’s now change the root password into something we’ll remember. Type:
passwd
and hit enter and follow the prompts. Now we want to do a quick software update to make sure everything is secure. Run both of these commands:
sudo aptitude update
sudo aptitude upgrade
We’ll use the sudo command often. It tells the server to perform the task as a super-user which gives you extra permissions to modify the system. Here’s another top-tip: At the command prompt, you can hit the up arrow on your keyboard to cycle through your previous commands.

Installing the Web Server Bits

This part of the tutorial is taken from symana.labs The next step is to install the LAMP stack. LAMP stands for (Linux, Apache, MySQL, PHP) and has all the basics to turn your server into a web server. It can be installed with a single command:
sudo tasksel install lamp-server
and follow the prompts. To secure the MySQL server from common database attacks, run:
mysql_secure_installation
Enter the password you set in the previous step and then enter “n” to keep it. Enter “Y” for the rest of the questions. To configure a fully qualified domain name for apache type:
echo "ServerName localhost" | sudo tee /etc/apache2/conf.d/fqdn
If you think you are going to be using MySQL for other applications on the server, you can install phpmyadmin to give you a graphical way to interact with the DB by running:
sudo apt-get install phpmyadmin
This isn’t required since we’ll be using a different database to load our geodata into. When you’re done configuring everything, restart apache with:
sudo apachectl restart
Now we have to configure the server’s hostname so we can contact it via a URL instead of the IP address. If you enter:
hostname -f
you should see the server name you entered when you setup the server. We want to turn that into a subdomain for our primary domain (for me it will be tiles.axismaps.com) but you can skip this if you don’t have your own domain (you’ll just keep using your IP address to connect to the server). To tell the server what the rest of the domain is, we’ll need to edit a few text files using nano, the built-in terminal text editor.
sudo nano /etc/hostname
Will show you something like:
tiles
You’ll want to change that to:
tiles..com
We are using tiles.axismaps.com for ours. When you’ve edited the file, hit Ctrl-X (not command if you’re on a Mac) then enter Y to save changes and hit Enter to overwrite the file. Do the same thing and add your domain to the second entry in:
sudo nano /etc/hosts
To make the changes stick, reboot your server with:
sudo reboot
The final step is to add a DNS record with your web host that points back to the server. From your server management page in Rackspace, click the DNS tab then click your domain name. Click “Add” to enter a new record with values:
  • Type: A
  • Name: tiles..com
  • Content:
  • TTL: 3600
When you click save, the record will be added but it will take a couple hours before it will propagate and you’ll be able to use it. By this point, the server will have rebooted so you can log in again with:
ssh root@
(or just hit the up key to access your last command) and remember to use your new password. Now we’ll setup the firewall to only allow certain types of connections to the server. To allow established connections to continue to function:
iptables -A INPUT -m state --state ESTABLISHED,RELATED -j ACCEPT
To allow SSH traffic:
iptables -A INPUT -p tcp --dport 22 -j ACCEPT
To allow HTTP traffic:
iptables -A INPUT -p tcp --dport 80 -j ACCEPT
To allow HTTPS traffic:
iptables -A INPUT -p tcp --dport 443 -j ACCEPT
To allow remote database connections:
iptables -A INPUT -p tcp --dport 5432 -j ACCEPT
Drop all remaining traffic:
iptables -A INPUT -j DROP
Save all the rules to a file:
sudo iptables-save > /etc/iptables.rules
To enable the firewall, we need to add the rules to the network adapter by editing the interfaces file:
sudo nano /etc/network/interfaces
and add the line:
pre-up iptables-restore < /etc/iptables.rules
just after iface eth0 inet static and make sure it is indented like the other lines. Save and exit the file then reboot the server. This is a good time to create a server backup. In Rackspace, click on “Images” then click “New On-Demand Image” to create a backup of your server. This way, if something goes wrong, you can be up and running again quickly.

Installing PostGIS

Some parts of this tutorial is taken from OpenStreetMap Wiki To give us access to all the software we’ll need, we need to add an additional software repository. First, enter:
sudo apt-get install python-software-properties
to install the command that will allow us to add new repositories. Then we can add a GIS-specific software repository by doing:
sudo add-apt-repository ppa:ubuntugis/ubuntugis-unstable
Now we need to update the system to allow it to pull down the available software from the new repository:
sudo aptitude update
We should be ready to install all of the PostGIS packages with:
sudo apt-get install postgresql-8.4-postgis postgresql-contrib-8.4
It will warn you about an old version of PostgreSQL but don’t worry about it. Now we need to setup PostGIS to make the newly installed database ready for GIS. Swtich to the database user:
sudo -u postgres -i -H
Now we will create a user within the database that can access your maps:
createuser -SdRP gisuser
Enter a password for connecting to the database (it should be different from your root password). Now we will create and configure a database to hold your spatial data:
createdb -E UTF8 -O gisuser gis
createlang plpgsql gis
psql -d gis -f /usr/share/postgresql/8.4/contrib/_int.sql
psql -d gis -f /usr/share/postgresql/8.4/contrib/postgis-1.5/postgis.sql
psql -d gis -f /usr/share/postgresql/8.4/contrib/postgis-1.5/spatial_ref_sys.sql
psql gis -c "ALTER TABLE geometry_columns OWNER TO gisuser"
psql gis -c "ALTER TABLE spatial_ref_sys OWNER TO gisuser"
exit
Now we need to configure access to our database first by editing the access file:
sudo nano /etc/postgresql/8.4/main/pg_hba.conf
Change the words ident and md5 to “trust” (there should be 3). If you want to connect to this database remotely (to view your data in an external manager or view it in QGIS) you should add the line:
# Enable remote connections:
host    all         all         0.0.0.0/0             md5
to the bottom of the file and then save and close. You’ll also need to enable remote listening by editing the main configuration file here:
sudo nano /etc/postgresql/8.4/main/postgresql.conf
and change the line:
#listen_addresses = 'localhost'
to
listen_addresses = '*'
(don’t forget to remove the “#” in front). Save and overwrite the file. To apply the changes, restart the database server:
sudo /etc/init.d/postgresql reload
To test if everything has been installed properly, log into the database as the new user we created.
psql gis gisuser
If you type d you should be able to see all 3 tables. Then type q to return.

Installing Mapnik

Copied exactly from the Mapnik Wiki To install Mapnik, enter:
sudo apt-get install libmapnik0.7 mapnik-utils python-mapnik
That’s it!

Installing TileStache

Some parts of this tutorial is taken from TileStache on GitHub The first step in installing TileStache is to install mod_python which is the interface TileStache will use to communicate with the web server. You can install it with:
sudo apt-get install libapache2-mod-python
Then restart your web server with:
sudo /etc/init.d/apache2 restart
Now we need to install some more packages that TileStache depends on. First we’ll switch to the directory where we’ll keep the new applications:
cd /etc
Install packages Curl and Git via aptitude to help with the install:
sudo apt-get install curl
sudo apt-get install git-core
Now install some python tools and libraries that are required:
sudo apt-get install python-setuptools
sudo aptitude install python-dev
sudo apt-get install libjpeg8 libjpeg62-dev libfreetype6 libfreetype6-dev
We’ll grab and install PIP to easily install python modules:
curl -O https://raw.github.com/pypa/pip/master/contrib/get-pip.py
sudo python get-pip.py
Now install the required python modules
sudo pip install -U werkzeug
sudo pip install -U simplejson
sudo pip install -U modestmaps
The Python Image Library module has some quirks in Ubuntu 11.10 so we need to do some quick fixes:
sudo ln -s /usr/lib/x86_64-linux-gnu/libjpeg.so /usr/lib
sudo ln -s /usr/lib/x86_64-linux-gnu/libfreetype.so /usr/lib
sudo ln -s /usr/lib/x86_64-linux-gnu/libz.so /usr/lib
Before we can install it:
sudo pip install -U pil
Finally we’ll download TileStache from GitHub:
git clone https://github.com/migurski/TileStache.git
And install it globally by running the install script:
cd TileStache/
python setup.py install
Finally, we’ll have to add the mod_python configuration to tell our web server which URLs to have TileStache process. Start by editing the apache configuration file:
sudo nano /etc/apache2/httpd.conf
and add this:

  AddHandler mod_python .py
  PythonHandler TileStache::modpythonHandler
  PythonOption config /etc/TileStache/tilestache.cfg
This will direct any web traffic to the “tiles” folder containing the file extension “.py” to TileStache. We just need to add a tiles directory to the web directory so we don’t get an error:
mkdir /var/www/tiles
Reboot your server to finish it off:
reboot

Testing Your Server

Once your server reboots, we can test to make sure TileStache is installed correctly and is running through mod_python and receiving maps from Mapnik. In your browser, go to: http://tiles..com/tiles/tiles.py/osm/preview.html You should see a OSM tiled map fullscreen, confirming TileStache is correctly installed and running. When you work with TileStache, you can always preview your tilesets at …/tiles/tiles.py//preview.html Now go to: http://tiles..com/tiles/tiles.py/example/preview.html You should see a simple gray country map which confirms that TileStache is talking to Mapnik, rendering a shapefile stored in the TileStache directory.

Finished

Now that everything is installed, you can go nuts with TileStache, Mapnik and PostGIS to render your own tiled maps. We’ll come back to this point in the coming weeks to show examples of how you can actually use these tools to make some maps. Some sample topics might include:
  • Thematic cartography with TileStache and Mapnik
  • Combining raster and vector tiles to optimize mapping for iPad
  • Custom map tiles from OSM data
  via:AxisMaps

Sunday, January 22, 2012

More spring cleaning out of season

This is our third blog post in our off-season spring cleaning series. To recap, we’re in the process of shutting a number of products which haven’t had the impact we’d hoped for, integrating others as features into our broader product efforts, and ending several which have shown us a different path forward. Overall, our aim is to build a simpler, more intuitive, truly beautiful Google user experience. In terms of the details, here is the latest update: Google Bookmarks Lists—This is an experimental feature for sharing bookmarks and collaborating with friends, which we’re going to end on December 19, 2011. All bookmarks within Lists will be retained and labeled for easier identification, while the rest of Google Bookmarks will function as usual. As Lists was an English-only feature, non-English languages will be unaffected. Google Friend Connect—Friend Connect allows webmasters to add social features to their sites by embedding a few snippets of code. We're retiring the service for all non-Blogger sites on March 1, 2012. We encourage affected sites to create a Google+ page and place a Google+ badge on their site so they can bring their community of followers to Google+ and use new features like Circles and Hangouts to keep in touch. Google Gears—In March we said goodbye to the Gears browser extension for creating offline web applications and stopped supporting new browsers. On December 1, 2011, Gears-based Gmail and Calendar offline will stop working across all browsers, and later in December Gears will no longer be available for download. This is part of our effort to help incorporate offline capabilities into HTML5, and we’ve made a lot of progress. For example, you can access Gmail, Calendar and Docs offline in Chrome. Google Search Timeline—We’re removing this graph of historical results for a query. Users will be able to restrict any search to particular time periods using the refinement tools on the left-hand side of the search page. Additionally, users who wish to see graphs with historical trends for a web search can use google.com/trends or google.com/insights/search/ for data since 2004. For more historical data, the "ngram viewer" in Google Books offers similar information. Google Wave—We announced that we’d stopped development on Google Wave over a year ago. But as of January 31, 2012, Wave will become read-only and you won’t be able to create new ones. On April 30 we will turn it off completely. You’ll be able to continue exporting individual waves using the existing PDF export feature until the Google Wave service is turned off. If you’d like to continue using this technology, there are a number of open-source projects, including Apache Wave and Walkaround. Knol—We launched Knol in 2007 to help improve web content by enabling experts to collaborate on in-depth articles. In order to continue this work, we’ve been working with Solvitor and Crowd Favorite to create Annotum, an open-source scholarly authoring and publishing platform based on WordPress. Knol will work as usual until April 30, 2012, and you can download your knols to a file and/or migrate them to WordPress.com. From May 1 through October 1, 2012, knols will no longer be viewable, but can be downloaded and exported. After that time, Knol content will no longer be accessible. Renewable Energy Cheaper than Coal (RE—This initiative was developed as an effort to drive down the cost of renewable energy, with an REpublished our results to help others in the field continue to advance the state of power tower technology, and we’ve closed our efforts. We will continue our work to generate cleaner, more efficient energy—including our on-campus efforts, procuring renewable energy for our data centers, making our

Exploring the earth with NASA and Google Earth Portable

  While it's often used in disaster situations, it can also be used for conducting research in areas that are far from internet connectivity. A great example of that is a project that Google and NASA conducted at Kelly Lake in British Columbia.   lake.jpg  Discovery Channel has a great video that features Googler Sean Maday (who has shown us some cool Google Earth Plug-in tools in the past). The video isn't embeddable, but you can watch it here on the Discovery Channel site.

Google Music & The Business

Last May at Google I/O, launched Music Beta by Google with a clear ambition: to help people access their music collections easily from any device. Music Beta enabled you to upload your personal music collection (up to 20,000 songs) for free to the cloud so you could stream it anywhere, any time. Today, the beta service evolves into a broader platform: Google Music. Google Music is about discovering, purchasing, sharing and enjoying digital music in new, innovative and personalized ways. Google Music helps you spend more time listening to your collection and less time managing it. We automatically sync your entire music library—both purchases and uploads—across all your devices so you don't have to worry about cables, file transfers or running out of storage space. We’ll keep your playlists intact, too, so your “Chill” playlist is always your “Chill” playlist, whether you’re on your laptop, tablet or phone. You can even select the specific artists, albums and playlists you want to listen to when you're offline. Purchase and share We also want to make it easy and seamless for you to grow your music collection. Today, we added a new music store in Android Market, fully integrated with Google Music. The store offers more than 13 million tracks from artists on Universal Music Group, Sony Music Entertainment, EMI, and the global independent rights agency Merlin as well as over 1,000 prominent independent labels including Merge Records, Warp Records, Matador Records, XL Recordings and Naxos. We’ve also partnered with the world's largest digital distributors of independent music including IODA, INgrooves, The Orchard and Believe Digital. You can purchase individual songs or entire albums right from your computer or your Android device and they’ll be added instantly to your Google Music library, and accessible anywhere. Good music makes you want to turn up the volume, but great music makes you want to roll down the windows and blast it for everyone. We captured this sentiment by giving you the ability to share a free full play of a purchased song with your friends on Google+. Exclusively on Google Music We’re celebrating our launch with a variety of music that you won’t find anywhere else, much of it free. There’s something for everyone, with a variety of free tracks to choose from:
  • The Rolling Stones are offering an exclusive, never-before-released live concert album, Brussels Affair (Live, 1973), including a free single, “Dancing with Mr. D.” This is the first of six in an unreleased concert series that will be made available exclusively through Google Music over the coming months.
  • Coldplay fans will find some original music that’s not available anywhere else: a free, live recording of “Every Teardrop Is A Waterfall”, a five-track live EP from their recent concert in Madrid and a remix of “Paradise” by Tiësto.
  • Busta Rhymes’s first single from his upcoming album, Why Stop Now (feat. Chris Brown), is available for free.
  • Shakira’s live EP from her recent concert in Paris and her new studio single, “Je L’Aime à Mourir” are both being offered up free.
  • Pearl Jam are releasing a live album from their 9/11/11 concert in Toronto, free to Google Music users.
  • Dave Matthews Band are offering up free albums from two live concerts, including new material from Live On Lakeside.
  • Tiësto is offering up a new mix, “What Can We Do” (feat. Anastacia), exclusively to Google Music users.
Artist hub Whether you’re on a label or the do-it-yourself variety, artists are at the heart of Google Music. With the Google Music artist hub, any artist who has all the necessary rights can distribute his or her own music on our platform, and use the artist hub interface to build an artist page, upload original tracks, set prices and sell content directly to fans—essentially becoming the manager of their own far-reaching music store. This goes for new artists as well as established independent artists, like Tiesto, who debuts a new single on Google Music today. Starting today, Google Music is open in the U.S. at market.android.com, and over the next few days, we will roll out the music store to Android Market on devices running Android 2.2 and above. You can also pick up the new music app from Android Market and start listening to your music on your phone or tablet today. And don’t forget to turn your speakers up to eleven.

Creating Applications with Client Handlers

  When it comes to writing UI applications in Apps Script, we get a lot of requests to support event callbacks that are handled in the user’s browser. For example, if your application has a form, you may want to disable a button after it is clicked the first time. Until now, the only way to do that would be by using an event handler on the server to disable that button. Using Client Handlers, your application can now respond to events in the browser without the need to perform a round trip to Google Apps Script servers. By cutting out the round trip to the server, your app can respond instantly to user input. Imagine, for example, you want to provide your users with instant feedback within your app when a user types text where a number is expected. Ideally, you would want to warn users as they type the value, instead of waiting until the form is submitted. Having a server event handler for each keystroke is definitely overkill for such a simple and common task. Luckily, these use cases are now supported with Apps Script’s new Client Handlers and validators! Let’s take a look at some code.

Client Handlers

A Client Handler allows you to react to any event in a browser without connecting to the server. What you can do in response to an event is limited to a set of predefined common actions, but you have a lot of flexibility in making your app more responsive. You can use Client Handlers in any UiApp regardless of whether you are embedding in a Spreadsheet or a Sites Page or publishing as a service. This simple application enables the user to click a button to display the classic “Hello world” message:
function doGet() {
  var app = UiApp.createApplication();
  var button = app.createButton("Say Hello");

  // Create a label with the "Hello World!" text and hide it for now
  var label = app.createLabel("Hello World!").setVisible(false);

  // Create a new handler that does not require the server.
  // We give the handler two actions to perform on different targets.
  // The first action disables the widget that invokes the handler
  // and the second displays the label.
  var handler = app.createClientHandler()
    .forEventSource().setEnabled(false)
    .forTargets(label).setVisible(true);

  // Add our new handler to be invoked when the button is clicked
  button.addClickHandler(handler);

  app.add(button);
  app.add(label);
  return app;
}
The Client Handlers in the above example are set up in two steps:
  1. Create a Client Handler just as we would create the server handlers you all know and love.
  2. Define the target widget for this handler. The target widget is the widget on which the handler will take action. We set the handler’s target in one of two ways: (a) By using the forTargets method to define the target widget. (b) By using the forEventSource method which lets widget wire itself to the client handler.
In the above example, we set the handler’s target to be the event source, so that it will apply to the button that is clicked. Finally, we define the action that the handler should take, in this case disabling the button using setEnabled(false). Aside from setEnabled, you can also change styles using setStyleAttribute, change text using setText, and so on. One Client Handler can perform multiple actions — just chain them together - and you can even change the target so that some actions apply to one set of widgets and some actions to another set. In our example, along with disabling the button, we set the handler to display the label when it is invoked, using setVisible.

Validators

Another new addition to Apps Script is support for validators in handlers. Validators allow handlers to check simple and complex conditions before they are invoked. For example, the following application adds two numbers given by the user, while using validators to make sure the server is only called if both of the text boxes contain numbers.
function doGet() {
  var app = UiApp.createApplication();

  // Create input boxes and button
  var textBoxA = app.createTextBox().setId('textBoxA').setName('textBoxA');
  var textBoxB = app.createTextBox().setId('textBoxB').setName('textBoxB');
  var addButton = app.createButton("Add");

  // Create a handler to call the adding function
  // Two validations are added to this handler so that it will
  // only invoke 'add' if both textBoxA and textBoxB contain
  // numbers
  var handler = app.createServerClickHandler('add')
      .validateNumber(textBoxA)
      .validateNumber(textBoxB)
      .addCallbackElement(textBoxA)
      .addCallbackElement(textBoxB);

  addButton.addClickHandler(handler)

  app.add(textBoxA);
  app.add(textBoxB);
  app.add(addButton);
  return app;
}

function add(e) {
  var app = UiApp.getActiveApplication();
  var result = parseFloat(e.parameter.textBoxA) + parseFloat(e.parameter.textBoxB);
  var newResultLabel = app.createLabel("Result is: " + result);
  app.add(newResultLabel);
  return app;
}
There’s a variety of validators to choose from that perform different tasks. You can verify the input to be a number, an integer, or an e-mail address. You can check for a specific length, or for any numerical value in a defined range. You can also use general regular expressions. Lastly, each validator has its negation. Note that validators work with both client and server handlers.

Putting it all together

Of course, validators and Client Handlers work best together. For example, in our addition application above, the “Add” button should be disabled as long as the current input is not numeric. We would also like to let the user know why the button is disabled by displaying an error message. To do so, we combine the power of server handlers, Client Handlers, and validators in the following way:
function doGet() {
  var app = UiApp.createApplication();

  // Create input boxes and button.
  var textBoxA = app.createTextBox().setId('textBoxA').setName('textBoxA');
  var textBoxB = app.createTextBox().setId('textBoxB').setName('textBoxB');
  var addButton = app.createButton("Add").setEnabled(false);
  var label = app.createLabel("Please input two numbers");

  // Create a handler to call the adding function.
  // Two validations are added to this handler so that it will
  // only invoke 'add' if both textBoxA and textBoxB contain
  // numbers.
  var handler = app.createServerClickHandler('add')
      .validateNumber(textBoxA)
      .validateNumber(textBoxB)
      .addCallbackElement(textBoxA)
      .addCallbackElement(textBoxB);

  // Create handler to enable the button well all input is legal
  var onValidInput = app.createClientHandler()
      .validateNumber(textBoxA)
      .validateNumber(textBoxB)
      .forTargets(addButton).setEnabled(true)
      .forTargets(label).setVisible(false);

  // Create handler to mark invalid input in textBoxA and disable the button
  var onInvalidInput1 = app.createClientHandler()
      .validateNotNumber(textBoxA)
      .forTargets(addButton).setEnabled(false)
      .forTargets(textBoxA).setStyleAttribute("color", "red")
      .forTargets(label).setVisible(true);

  // Create handler to mark the input in textBoxA as valid
  var onValidInput1 = app.createClientHandler()
      .validateNumber(textBoxA)
      .forTargets(textBoxA).setStyleAttribute("color", "black");

  // Create handler to mark invalid input in textBoxB and disable the button
  var onInvalidInput2 = app.createClientHandler()
      .validateNotNumber(textBoxB)
      .forTargets(addButton).setEnabled(false)
      .forTargets(textBoxB).setStyleAttribute("color", "red")
      .forTargets(label).setVisible(true);

  // Create handler to mark the input in textBoxB as valid
  var onValidInput2 = app.createClientHandler()
      .validateNumber(textBoxB)
      .forTargets(textBoxB).setStyleAttribute("color", "black");

  // Add all the handlers to be called when the user types in the text boxes
  textBoxA.addKeyUpHandler(onInvalidInput1);
  textBoxB.addKeyUpHandler(onInvalidInput2);
  textBoxA.addKeyUpHandler(onValidInput1);
  textBoxB.addKeyUpHandler(onValidInput2);
  textBoxA.addKeyUpHandler(onValidInput);
  textBoxB.addKeyUpHandler(onValidInput);
  addButton.addClickHandler(handler);

  app.add(textBoxA);
  app.add(textBoxB);
  app.add(addButton);
  app.add(label);
  return app;
}

function add(e) {
  var app = UiApp.getActiveApplication();
  var result = parseFloat(e.parameter.textBoxA) + parseFloat(e.parameter.textBoxB);
  var newResultLabel = app.createLabel("Result is: " + result);
  app.add(newResultLabel);
  return app;
}
All of these features can be used to create more advanced and responsive applications. Client handlers can be used to change several attributes for widgets, and validators can help you check a variety of different conditions from well formed email addresses to general regular expressions.

Tuesday, January 17, 2012

YouTube API: Building Professional Video Sites

Using video on your website can add greater depth and richness for your audience. However, to do encoding, hosting and streaming right it takes some time and skill. If you’re lacking in either, here are some suggestions for sites that make it easy to help you setup video-based websites.
VidCaster is a video content management system, whose goal is to make building a website with video as easy as possible. VidCaster makes use of custom URLs, video sitemaps, metadata, and thumbnails to integrate well with search engines. They provide lots of features to customize your video site, like uploading a logo, picking a theme and choosing custom colors, and you can even upload custom CSS. Using their video management interface, you can publish, unpublish and delete videos. VidCaster can even distribute the videos from your video site to third-party sites such as YouTube and Twitter, and they can also integrate analytics from third-party sources. VidCaster uses OAuth2 with the YouTube API to manage the user’s YouTube account, using both SUP (Simple Update Protocol) and polling to make sure a user’s video site is always in sync with their YouTube channel. Companies that use VidCaster include AirBnB, Hackers and Founders, and Dirtcast.
By integrating closely with YouTube’s data API, VidCaster makes it easy for users to take advantage of YouTube’s video service from within their own custom video site.
Moviecom.tv tries to make it easy for businesses to build video sites about their company. Like VidCaster, Moviecom.tv provides users with a variety of features to customize their video site. They too show videos hosted on YouTube, but their integration with YouTube doesn’t yet include all the features that VidCaster does — for instance, Moviecom.tv can show YouTube videos using the iframe player, but they haven’t yet integrated with YouTube’s data API. This is something they plan on doing early in 2012. Moviecom.tv also touts their mobile application which takes the friction out of recording and uploading video to the right place. And they’re doing well at it — they were recently named a Red Herring Global 100 Winner. Internet World, City Index, and Staples are all example sites created using their platform:
Companies like VidCaster and Moviecom.tv are a welcome part of the online video ecosystem. As Moviecom.tv CEO Gillian O'Neil once noted, Moviecom.tv isn’t competing with YouTube. By enabling third-party video sites to embed YouTube videos, YouTube isn’t trying to get a bigger piece of the pie. They’re making the pie bigger.

Engagement & Discovery in the Google Apps Marketplace

  We recently updated the Google Apps Marketplace with several new features to help developers better engage with their customers and improve discoverability of apps in the marketplace.  

Reply to Comments & Reviews

It’s no secret that engaging your customers and responding to their feedback is critical to success. It’s now possible to engage in conversations with customers based on comments & reviews for your app in the marketplace.  

Rich Application Snippets in Google Search

Google Search recently introduced rich snippets for applications several months ago with enhanced search results for applications from marketplaces like Android Market and others. Marketplace apps will soon be appearing as rich snippets with ratings and pricing details.  

New Category Home Pages

Lastly, we introduced new home pages for each category in the Marketplace to feature the top installed and newest apps for that category.

Monday, January 16, 2012

Domain user management

  Managing the user accounts in a Google Apps domain can be a daunting task when you have hundreds or thousands of them and you have no tools to automate the process. The Google Apps Provisioning API allows developers to write user management applications in the programming language of their choice, but many system administrators prefer a script-based solution instead. The recently launched UserManager Apps Script service fills the gap, providing Google Apps domain administrators an easy way to automate tasks such as batch user creation or update. With the new Apps Script service, creating a user will be as easy as writing a single line of code:
var user = UserManager.createUser("newuser", "John", "Smith", "mypassword");
The UserManager service also makes it easy to perform the same task on each account in the domain. The following sample shows how you can force all users to change their passwords at the next login:
var users = UserManager.getAllUsers();
for (var i in users) {
    users[i].setChangePasswordAtNextLogin(true);
}
Calls to the UserManager service can also be scheduled to run hourly or daily, or in response to certain events thanks to Apps Script Triggers.

Google Apps - News

The elves got an early jump on the holidays this year by leaving us some surprises in Google Apps over the last few weeks. Sharing from Gmail got a whole lot easier, and Google Calendar can make better use of precious screen space. We also have 10 new Google Apps customer stories to share from the tens of thousands that have gone Google in recent weeks. Gmail gets more social Last week we sprinkled a touch of Google+ into Gmail, making it easier to connect and share with people from your inbox. You can add people to circles right from an email thread through Gmail’s people widget, share photo attachments with friends and family on Google+ without leaving Gmail, and view a filtered version of your inbox only showing messages from people in your circles. We also improved Gmail’s address book by incorporating contact information shared by your friends, family and colleagues in their Google+ profiles.
New features in the Gmail iOS app Just yesterday we added several new improvements to the Gmail app for iOS 4+. Now you can set up a custom email signature for mobile messages, manage your vacation responder, and view nested labels from your iPhone, iPad or iPod Touch. We also added scribbles, a fun way to spice up messages by adding a quick hand-drawn sketch. You can create scribbles using a range of colors, brush sizes, lines, erasers and spray paints from your touchscreen device.
More free calls right from Gmail Last year we introduced free domestic calling in Gmail within the U.S. and Canada, and we’re extending this free service for the whole year of 2012. We’re happy to help you keep in touch with those special people in your life, for free. Hide morning and night hours in Calendar If you don’t often have appointments early in the morning or late at night, a new trick in Google Calendar might be useful. Now you can hide morning and night hours, leaving more screen real estate for the times of day when most of your events take place. Give it a try in Calendar Labs.
Who’s gone Google? Businesses and schools are switching to Google Apps in droves these days. From tiny startups to large enterprises and nonprofits to college campuses, we love hearing the inspiring stories that our customers share. Here’s a new batch of stories for your reading pleasure: TripIt, IPSEN, Ebby Halliday, Ticket River, VigLink, HeyZap, The Great Books Foundation, Utah K-12 schools, the U.S. Coast Guard Academy and UC Santa Cruz.

Wednesday, January 11, 2012

The next version of the Google Calendar API

  The Google Calendar API is one of Google’s most used APIs. Today, we’re rolling out a new version of the API that will give developers even more reasons to use it. Version three of the Google Calendar API provides several improvements over previous versions of the API: Developers familiar with the Google Tasks API will feel right at home with Calendar API v3, as it uses similar syntax and conventions, as well as the same base client libraries. These Google-supported client libraries, based on discovery, are available in many languages with: If you’re new to the Google Calendar API, getting started is easy. Check out the Getting Started Guide, which will walk you through the basic concepts of Google Calendar, the API, and authorization. Once you’re ready to start coding, the Using the API page will explain how to download and use the client libraries in several languages. If you’d like to try out some queries before you start coding, check out the APIs Explorer and try out some example queries with the new API. Developers already using older versions of the API can refer to our Migration Guide. This interactive guide offers side-by-side examples of the API in v2 and v3 flavors across both the protocol and multiple languages. Simply hover over the code in v2 (or v3) and see the equivalent in the other version. With our announcement of v3 of the API, we’re also announcing the deprecation of the previous versions (v1 and v2). The older versions enter into a three year deprecation period, beginning today, and will be turned off on November 17, 2014. We’d love to hear your feedback on the Google Calendar API v3. Please feel free to reach out to us in the Google Calendar API forum with any questions or comments you have.

Sunday, January 8, 2012

The Gmail app for iPhone, iPad and iPod touch

 
Waiting. Walking. Watching TV. Working out. Winding down. Waking up. We check email pretty much everywhere these days. And when we do, we want easy access to our important messages so we can respond quickly and get back to life -- or slinging birds at thieving green pigs.
With that in mind, we’ve created a new Gmail app for iPhone, iPad, and iPod touch. We’ve combined your favorite features from the Gmail mobile web app and iOS into one app so you can be more productive on the go. It’s designed to be fast, efficient and take full advantage of the touchscreen and notification capabilities of your device. And it’s one more reason to switch to Gmail. Speed We want to give you the information you need quickly, with minimal effort and distraction. So we’ve included some time-saving features:
  • Get alerted to new messages with push notifications and sounds
  • Find an email in seconds with search across your entire inbox
  • Autocomplete email addresses from your Gmail contacts or select from your device’s address book
  • Upload photos with a click using the new attachment button in compose view
  • On iPad, navigate your inbox and read your mail simultaneously with split view
 
Upload photos Reply, move, label and more
Efficiency Our inboxes overflow with dozens and even hundreds of messages a day—and this can be even more challenging on a smaller screen. The new Gmail app helps organize your mail so you don’t have to go wading through your inbox to find that key message from your boss or loved one:
  • Focus on your important messages first with Priority Inbox
  • Quickly scan countless emails on the same subject with threaded conversations
  • Organize your mail by archiving, labelling, starring, deleting and reporting spam
  Threaded conversations on the iPadTouch We’ve also optimized the interface so you can perform common actions in Gmail with the lightest touch:
  • Pull down your inbox to rapidly refresh if you’re eager for new mail
  • Swipe right to view your labels without ever leaving your inbox
  • Swiftly scroll through dozens of emails just by sliding your finger
 
Pull down to refresh Swipe right to view labels
We hope the Gmail app makes checking email on the go a little easier. It is available in the App Store today and works on all devices running iOS 4+. For more information, check out our help center.(Cross posted on the Official Gmail Blog and Google Enterprise Blog)

Google Apps Script

  Here’s the scenario: you create a form, you have a script that triggers onFormSubmit and all is well... until it gets popular. Occasionally you start having interlacing modifications from separate invocations of your script to the spreadsheet. Clearly, this kind of interlacing is not what you intended for the script to do. Up until now, there was no good solution to this problem -- except to remain unpopular or just be lucky. Neither are great solutions. Now, my friend, you are in luck! We’ve just launched the LockService to deal with exactly this problem. The LockService allows you to have only one invocation of the script or portions thereof run at a time. Others that would’ve run at the same time can now be made to wait nicely in line for their turn. Just like the line at the checkout counter. The LockService can provide two different kinds of locks-- one that locks for any invocation of your script, called a public lock, and another that locks only invocations by the same user on your script, called a private lock. If you’re not sure, using a public lock is the safest bet. For example, in the scenario in the previous paragraph you would want something like this:
function onFormSubmit() {
  // we want a public lock, one that locks for all invocations
  var lock = LockService.getPublicLock();
  lock.waitLock(30000);  // wait 30 seconds before conceding defeat.
  // got the lock, you may now proceed
  ...whatever it used to do here....
  lock.releaseLock();
}
It’s best to release the lock at the end, but if you don’t, any locks you hold will be released at the end of script execution. How long should you wait? It depends on two things mainly: how long the thing you’re going to do while holding the lock takes, and how many concurrent executions you expect. Multiply those two and you’ll get your timeout. A number like 30 seconds should handle a good number of cases. Another way to pick the number is frankly to take an educated guess and if you guess too short, the script will occasionally fail. If you want to avoid total failure if you can’t get the lock, you also have the option trying to get the lock and doing something else in the event of not being able to get it:
function someFunction() {
  var lock = LockService.getPublicLock();
  if (lock.tryLock(30000))  {
    // I got the lock!  Wo000t!!!11 Do whatever I was going to do!
  } else {
    // I couldn’t get the lock, now for plan B :(
    GmailApp.sendEmail(“admin@example.com”, “epic fail”,
        “lock acquisition fail!”);
  }
}
So now your scripts can be as popular as they can get with no worries about messing up shared resources due to concurrent edits! Check out the LockService documentation for more information.

Saturday, January 7, 2012

Calendar API v3

  We recently launched a new version of the Google Calendar API. In addition to the advantages it gains from Google's new infrastructure for APIs, Google Calendar API v3 has a number of improvements that are specific to Google Calendar. In this blog post we’ll highlight a topic that often causes confusion for developers using the Google Calendar API: recurring events. A recurring event is a 'template' for a series of events that usually happen with some regularity, for example daily or bi-weekly. To create a recurring event, the client specifies the first instance of the event and includes one or more rules that describe when future events should occur. Google Calendar will then 'expand' the event into the specified occurrences. Individual events in a series may be changed, or even deleted. Such events become exceptions: they are still part of the series, but changes are preserved even if the recurring event itself is updated. Let's create a daily recurring event that will occur every weekday of the current week (as specified by the recurrence rule on the last line):
POST https://www.googleapis.com/calendar/v3/calendars/primary/events

{
  "summary": "Daily project sync",
  "start": {
    "dateTime": "2011-12-12T10:00:00",
    "timeZone": "Europe/Zurich"
  },
  "end": {
    "dateTime": "2011-12-12T10:15:00",
    "timeZone": "Europe/Zurich"
  },
  "recurrence": [
    "RRULE:FREQ=DAILY;COUNT=5"
  ]
}
When added to a calendar, this will turn into five different events. The recurrence rule is specified according to the iCalendar format (see RFC 5545). Note, however, that, in contrast to the previous versions of the Google Calendar API, the start and end times are specified the same way as for single instance events, and not with iCalendar syntax. Further, note that a timezone identifier for both the start and end time is always required for recurring events, so that expansion happens correctly if part of a series occurs during daylight savings time. By default, when listing events on a calendar, recurring events and all exceptions (including canceled events) are returned. To avoid having to expand recurring events, a client can set the singleEvents query parameter to true, like in the previous versions of the API. Doing so excludes the recurring events, but includes all expanded instances. Another way to get instances of a recurring event is to use the 'instances' collection, which is a new feature of this API version. To list all instances of the daily event that we just created, we can use a query like this:
GET https://www.googleapis.com/calendar/v3/calendars/primary/events/7n6f7a9g8a483r95t8en23rfs4/instances
which returns something like this:
{
  ...
  "items": [
  {
    "kind": "calendar#event",
    "id": "7n6f7a9g8a483r95t8en23rfs4_20111212T090000Z",
    "summary": "Daily project sync",
    "start": {
      "dateTime": "2011-12-12T10:00:00+01:00"
    },
    "end": {
      "dateTime": "2011-12-12T10:15:00+01:00"
    },
    "recurringEventId": "7n6f7a9g8a483r95t8en23rfs4",
    "originalStartTime": {
      "dateTime": "2011-12-12T10:00:00+01:00",
      "timeZone": "Europe/Zurich"
    },
    ...
  },
  … (4 more instances) ...
Now, we could turn one instance into an exception by updating that event on the server. For example, we could move one meeting in the series to one hour later as usual and change the title. The original start date in the event is kept, and serves as an identifier of the instance within the series. If you have a client that does its own recurrence rule expansion and knows the original start date of an instance that you want to change, the best way to get the instance is to use the originalStart parameter like so:
GET https://www.googleapis.com/calendar/v3/calendars/primary/events/7n6f7a9g8a483r95t8en23rfs4/instances?originalStart=2011-12-16T10:00:00%2B01:00
This would return a collection with either zero or one item, depending on whether the instance with the exact original start date exists. If it does, just update or delete the event as above. Lastly, in Google Calendar API v3, we have added the ability to revert the changes made to an individual instance, so it is no longer an exception. One way of doing something similar with the previous versions of the API would be to just copy all fields from the underlying recurring event into the instance and perform an update. That is an incomplete solution, however, because fields that were once updated in the exception would not be updated when the recurring event changes. The proper way to do this now is to use the reset method on the event. To undo the changes we did to our Friday meeting, we would issue a request like this:
POST https://www.googleapis.com/calendar/v3/calendars/primary/events/7n6f7a9g8a483r95t8en23rfs4_20111216T090000Z/reset
We hope you’ll find value in these changes to recurring events. Keep in mind, too, that these are not the only improvements in Google Calendar API v3. Look for an upcoming post describing best practices for another key area of improvement: reminders.

Wednesday, January 4, 2012

Tu-22MZ

300 mm Smerch

Google Earth: Dar Bishi Synagogue

  Google Earth is an amazing way to visit places around the world that you may never have the opportunity to visit, but it also allows people to visit locations that no one may be able to visit again. A great example of that is the Dar Bishi Synagogue in Tripoli, Libya, which was heavily damaged in recent decades. While future restoration of the Synagogue is still the goal of pepole like Dr. David Gerbi, you can view the fully restored Synagogue right now in Google Earth!   dar-bishi.jpg  From Diarna.org:
Media reports abound about the efforts of Dr. David Gerbi to restore the dilapidated Dar Bishi Synagogue, a former fixture of Tripoli's Hara Kebira (old Jewish Quarter). Gerbi, a Libyan Jew who has lived in exile since 1967, returned to his ancestral home this past spring as a volunteer in support of the anti-Gaddafi regime revolutionaries. Remaining after the fall of Col. Muammar Gaddafi, Gerbi single-handedly re-opened Dar Bishi for prayer - his own, as the last member of the disbanded indigenous Jewish community died in 2003 - and began restoring the synagogue by clearing decades of accumulated debris. The work was abruptly put on indefinite hold on October 8th, Yom Kippur (the Jewish holiday of atonement), when hundreds of protesters gathered in Tripoli and Bengazi to assert "There is no place for the Jews in Libya." Gerbi was prevailed upon to leave the country after protesters attempted to storm his hotel and disagreements arose with the provisional government about whether he had received the proper authorizations.

Monday, January 2, 2012

SketchUp: Ideas Made Real

  In November, we launched the Make Ideas Real project with the goal of creating a showcase of the best SketchUp work from around the world. To build out this showcase, we asked you all to share stories of how SketchUp is helping you to turn your ideas into something tangible. The response has been overwhelming. In just one month, our launch video received nearly quarter million views and several hundred of you took the time to tell us your SketchUp story. Your positive reaction and the quality of the work you’ve shared with us is inspiring, but to truly blow out this showcase, we need to hear from even more of you. If SketchUp has helped you turn an idea into reality, we want to hear about it. And for your inspiration, here are just a few of the hundreds of quality submissions we’ve received so far:
  Wine Bar design by Bertier Luyt of FranceMore images (See! You can use SketchUp to build a wine bar.)    
  Scout Trebuchet by Peter Leroux and friends of South AfricaMore images | 3D model | Ropes and Poles blog  
  X Games Street and Park Courses by Dug Ketterman of CaliforniaDug's website  
  The Machine by Evan Seccombe of CaliforniaA re-imagined prop from the film Contact, 3D printed

Sunday, January 1, 2012

Documents List API

Google have recently added a new section to the Google Documents List API documentation, titled Handling AP errors. A number of developers in the forum have asked what to do when certain requests cause errors, and this documentation responds to their general need for better information. This new documentation details all errors and the scenarios that cause them. We strongly recommend that both new and advanced Google Documents List API developers read the section thoroughly. An important technique described in the new docs is exponential backoff. Exponential backoff helps clients to automatically retry requests that fail for intermittent reasons. For example, an application might make too many requests to the API in a short period of time, resulting in HTTP 503 responses. In cases like this, it makes sense for API clients to automatically retry the requests until they succeed. Exponential backoff can be implemented in all of the Google Data API client libraries. An example in Python follows:
import random
import time

def GetResourcesWithExponentialBackoff(client):
  """Gets all of the resources for the authorized user

  Args:
    client: gdata.docs.client.DocsClient authorized for a user.
  Returns:
    gdata.docs.data.ResourceFeed representing Resources found in request.
  """
  for n in range(0, 5):
    try:
      response = client.GetResources()
      return response
    except:
      time.sleep((2 ** n) + (random.randint(0, 1000) / 1000))
  print "There has been an error, the request never succeeded."
  return None
We strongly recommend developers take about 30 minutes and update applications to use exponential backoff. For help doing this, please read the documentation and post in the forum if you have any questions.

Share This: